

For classic vehicle enthusiasts, the beauty of vintage cars often goes hand-in-hand with the challenge of maintaining their original components. Among these components, drum brakes are essential for ensuring safe and reliable stopping power. Understanding the unique upkeep requirements of drum brakes is crucial for preserving the performance and integrity of classic vehicles.
Drum brakes operate differently than modern disc brakes, utilizing friction between brake shoes and a rotating drum to slow down the vehicle. This design requires regular attention to ensure optimal functionality. Regular inspection and maintenance can prevent premature wear and enhance the driving experience. It is essential for owners to familiarize themselves with the specific needs of their classic car’s braking system.
Proper upkeep of drum brakes includes checking for wear on the brake shoes, ensuring the drum is free of cracks or grooves, and maintaining appropriate brake fluid levels. By implementing a consistent maintenance schedule, vintage vehicle owners can safeguard their drum braking systems, ensuring both safety and performance longevity. This article will delve deeper into effective maintenance strategies for drum brakes, enabling classic car aficionados to keep their cherished vehicles on the road for years to come.
Understanding Drum Brake Components and Their Functions
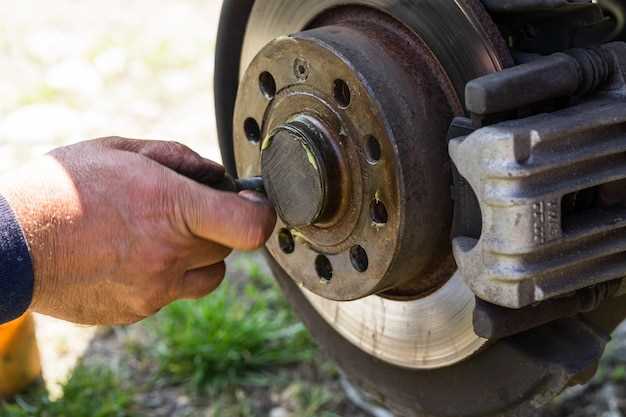
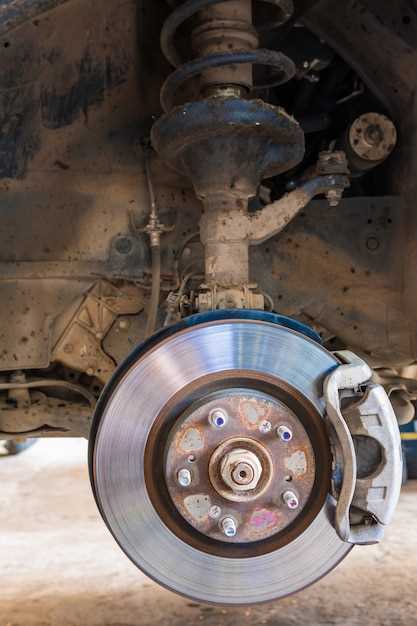
Drum brakes consist of several crucial components that work in harmony to ensure effective stopping power. Understanding these parts is essential for the upkeep of classic vehicles.
The primary component of drum brakes is the brake drum itself. This cylindrical part rotates with the wheel and provides a surface against which the brake shoes exert force to slow down the vehicle. The interior of the drum is typically coated with a friction material that helps amplify the braking effect.
Next, the brake shoes act as the primary contact points for braking. When the brake pedal is engaged, hydraulic pressure is generated, pushing the shoes outward against the drum. This friction generates the necessary resistance to halt the vehicle’s motion. The shoes are lined with a durable material that should be regularly inspected and replaced if worn.
The wheel cylinder is another essential component. It houses pistons that are activated when the brakes are applied. These pistons push the brake shoes outward. Maintaining the wheel cylinder’s fluid levels and ensuring there are no leaks are vital for optimal brake performance.
The return springs play a significant role in the drum brake system. Once the brake pedal is released, these springs pull the brake shoes back to their resting position, ensuring they do not remain in contact with the drum. Properly functioning springs are crucial for preventing premature wear.
Lastly, the adjusting mechanism helps maintain the proper distance between the brake shoes and the drum. This component ensures that brake performance remains consistent, adapting as the brake shoes wear down over time. Regular adjustment can enhance braking efficiency and prolong the life of all components involved.
By understanding the roles of each component, vehicle owners can better manage the upkeep of their classic drum brake systems, ultimately improving safety and performance on the road.
Identifying Signs of Wear and Damage in Drum Brakes
Proper upkeep of drum brakes is essential for ensuring the safety and performance of classic vehicles. Regular inspections can help identify signs of wear and damage that may compromise brake efficiency. Here are some key indicators to look for:
- Unusual Noises: Listen for grinding, squeaking, or scraping sounds when braking. These noises often suggest that the brake shoes are worn down or that other components are damaged.
- Pulsating Brake Pedal: A pulsating sensation when applying the brakes can indicate warped brake drums or uneven wear of the brake shoes.
- Pulling to One Side: If the vehicle pulls to one side when braking, it may signal uneven brake shoe wear or a malfunction in the brake hardware.
- Increased Stopping Distance: If you notice a longer distance required to stop, this may be a result of degraded brake components, requiring immediate attention.
- Visual Inspection: Regularly check the drum and shoe for cracks, scoring, or signs of contamination from oil or grease. Look for any debris or corrosion that could affect performance.
- Brake Fluid Condition: Inspect the brake fluid for clarity and proper level. Dirty or low brake fluid could indicate issues within the braking system, prompting further examination.
Being proactive about identifying these signs can help maintain the reliability of drum brakes in classic vehicles. If any indication of wear or damage is found, consult a professional for further evaluation and repair.
Step-by-Step Guide to Drum Brake Adjustment
Proper upkeep of drum brakes ensures optimal performance and safety in classic vehicles. Follow these steps for adjusting drum brakes effectively.
Step 1: Gather Tools and Materials
Before you begin, assemble the necessary tools: a brake adjusting tool, jack stands, a lug wrench, and a clean cloth. Ensure you have access to your vehicle’s service manual for specific instructions related to your model.
Step 2: Prepare the Vehicle
Park your classic vehicle on a flat surface and engage the parking brake. Loosen the lug nuts on the rear wheels but do not remove them completely yet. Place the vehicle on jack stands for safety.
Step 3: Remove the Wheels
Once the vehicle is securely on jack stands, remove the lug nuts and take off the wheels to expose the drum brakes. Keep the lug nuts in a safe place for reinstallation.
Step 4: Inspect the Drum and Shoes
Check the brake drum and shoes for wear and tear. Look for scoring or any signs of damage. If the components are excessively worn, consider replacing them before adjustment.
Step 5: Locate the Adjustment Access
Find the brake adjustment hole on the backing plate. Depending on the design, this may involve removing a rubber plug or simply accessing it directly. Ensure you have smooth access to the adjuster wheel.
Step 6: Adjust the Brake Shoes
Use the brake adjusting tool to turn the adjuster wheel. Turning it clockwise typically expands the shoes, while counterclockwise retracts them. Adjust until the shoes lightly contact the drum, providing no excess drag.
Step 7: Reassemble the Brake Components
After adjustments are complete, check that all parts are securely in place. Replace any rubber plugs you removed. Reinstall the wheels and tighten the lug nuts in a star pattern to ensure even seating.
Step 8: Lower the Vehicle
Carefully remove the jack stands and lower the vehicle to the ground. Ensure the parking brake is released.
Step 9: Test the Brakes
Drive the vehicle at a low speed and test the brakes. Listen for unusual noises and ensure the vehicle stops smoothly. If needed, repeat the adjustment process for optimal performance.
Step 10: Regular Maintenance
Incorporate drum brake adjustments into your regular maintenance routine to enhance safety and longevity. Frequent checks and adjustments will keep your classic vehicle’s braking system functioning efficiently.
How to Properly Inspect and Replace Brake Shoes
Maintaining drum brakes in classic vehicles requires regular upkeep to ensure optimal performance and safety. Brake shoes are a crucial component of the braking system, as they provide the necessary friction to slow down the vehicle. Inspecting and replacing brake shoes is an essential task that every classic car owner should be familiar with.
To begin the inspection process, gather the following tools: a jack, jack stands, a wheel chock, a lug wrench, and a brake shoe gauge. First, secure the vehicle on a level surface and engage the parking brake. Loosen the lug nuts slightly before lifting the vehicle with the jack. Once lifted, place the jack stands under the vehicle for safety, and completely remove the lug nuts to detach the wheel.
With the wheel removed, you can access the drum brake assembly. Begin by inspecting the brake shoes for wear. Utilize a brake shoe gauge to measure the remaining thickness of the friction material. If the thickness is less than 1/8 inch, it is time to replace the shoes. Additionally, inspect the surface for cracks, glazing, or any signs of contamination from oil or grease.
| Inspection Criteria | Acceptable Condition |
|---|---|
| Friction Material Thickness | More than 1/8 inch |
| Surface Cracks | No visible cracks |
| Glazing | Avoided or minimal |
| Oil/Grease Contamination | None present |
If the brake shoes fail to meet the acceptable criteria, you must proceed with replacement. Before installing new shoes, clean the drum surface to remove any debris or dust. Ensure the drum is also in good condition; if it’s scored or worn, resurface or replace it as needed.
To install the new brake shoes, follow the manufacturer’s instructions carefully. Begin by positioning the new shoes in the drum assembly and securing them with the appropriate springs and clips. Make sure they move freely without binding. Once installed, reattach the drum and wheel, tightening the lug nuts to the recommended torque specifications.
After the replacement, it’s crucial to test the brakes before driving the vehicle. Push the brake pedal a few times to seat the shoes against the drum properly. Monitor for any abnormalities during a short test drive. Proper inspection and timely replacement of brake shoes will enhance safety and improve the overall braking performance of your classic vehicle.
Cleaning and Lubricating Drum Brake Assemblies
Regular upkeep of drum brakes is essential for ensuring optimal performance and longevity in classic vehicles. Cleaning and lubricating the brake assembly not only enhances the efficiency of the braking system but also prevents premature wear and damage. The process begins with removing the drum to access the internal components.
Thoroughly clean the inner surfaces of the drum and the brake shoes using a suitable brake cleaner. This removes dust, debris, and old lubricants that can hinder performance. Avoid using solvents that could leave residues. Once cleaned, inspect the brake shoes for wear and replace them if necessary.
Lubrication is critical in areas where metal parts come into contact. Apply a thin layer of high-temperature brake grease to the contact points, such as the backing plate and where the shoes move. This ensures smooth operation and minimizes noise during braking. Be cautious not to over-lubricate, as excess grease can attract dust and debris, leading to issues in the braking system.
After lubrication, reassemble the drum brake assembly, ensuring all components are securely fastened. Lastly, test the brakes to confirm proper function. Regular maintenance, including cleaning and lubricating drum brake assemblies, is vital for the safety and reliability of your classic vehicle’s braking performance.
Tips for Storing Classic Vehicles with Drum Brakes
Proper storage is crucial for preserving the condition of classic vehicles, especially those equipped with drum brakes. Here are some essential tips to ensure the upkeep of your classic vehicle during storage:
- Clean Thoroughly: Before storing, give your vehicle a thorough wash and waxing. This removes dirt, grime, and moisture that can foster corrosion.
- Check Fluid Levels: Ensure all fluids, including brake fluid, are at appropriate levels. Fresh brake fluid helps prevent moisture accumulation within the drum system.
- Inspect Brake Components: Examine brake shoes, drums, and hardware for wear. Replace any worn parts before storing to avoid issues when you start using the vehicle again.
When it comes to the environment of your storage area:
- Climate Control: Store your vehicle in a temperature-controlled environment to minimize the risk of rust and deterioration. Avoid humid areas.
- Vehicle Positioning: Place your vehicle on a flat surface with enough space around it. Consider using jack stands to avoid tire flat spots and keep the drums off the ground.
- Avoid direct sunlight: Keep the vehicle covered or in a shaded area to protect the paint and components from UV damage.
Lastly, periodic checks during storage can greatly benefit your vehicle:
- Monthly Inspections: Periodically inspect the vehicle for any signs of deterioration or leaks. This ensures that any issues can be addressed promptly.
- Start the Engine: If possible, start the engine occasionally to keep the mechanics lubricated and functional.
- Move the Vehicle: If feasible, move the vehicle periodically to prevent the brakes from seizing and to ensure the fluids circulate properly.
By following these tips, you can maintain drum brakes and ensure the longevity of your classic vehicle during storage.


